Tuesday, December 30, 2014

Terrific Tips Tuesday

I just have two simple tips today, mostly relating to punches. You know I love my Big Shot, but sometimes you have to make a project (or many of the same project) and you need a simple way to give it big impact. Here I was able to make many tags using 4 punches. I worked in an assembly line fashion and quickly had little treat bags ready to give to our Sunday School volunteers. Using DSP punched out with the circle punch added geometric pop behind the Christmas tree. You could always step this project up by adding rhinestones, glitter or Dazzling Details, but I think these simple tags stand very well on their own.
1 3/4" Circle Punch $16.95 #119850
1-3/4" Circle Punch
Tag Topper Scalloped Punch $22.95 #133324
Tag Topper Scalloped Punch
Tree Punch $16.95 #135859
Tree Punch by Stampin' Up!
Modern Label Punch $16.95 #119849
Modern Label Punch
I also altered the October My Paper Pumpkin kit into little tree gift boxes. I was able to use the tree punch to create a window. I trimmed a window sheet down to fit and adhered it using glue dots. I topped the tree off with a cute Champaign Glimmer Paper star. Again, easy, but big impact!

Friday, December 26, 2014

Flashback Friday (October Stamp Club Projects)

Here's a bit of a Flashback. I was looking up an older post and realized I never shared about our October Club projects!  I loved them and I can't believe I forgot!
1.       Cut out background using Lattice Trellis Die.
2.       Stamp sentiment and flag the end using the square punch or a pair of scissors.
3.       Punch 3 ovals using the oval punch. Sponge the edges using Soft Suede ink. Adhere two ovals with sides slightly overlapping. Adhere the third oval using a Dimensional.
4.       Cut out the leaf and vine using the Little Leaves Sizzlet Die. Trim to fit.
5.       Punch the Daffodil Delight card stock using the Boho Blossom Punch.
6.       Run the Chocolate Chip card stock through the Big Shot using the Lattice Embossing  Folder. Adhere to the flower and attach to the pumpkin.
7.       Stamp sentiment for inside of card on Whisper White card stock and adhere to inside of card.

1.       Using Lost Lagoon ink and Sponge Dauber, add polka dots to bag.
2.       Pick your favorite pattern of Designer Series Paper and cut it out using the Big Shot and the Chalk Talk Framelits.
3.       Stamp and punch out tag sentiment using Tangerine Tango ink and Artisan Label Punch. Adhere to tag using Dimensionals.
4.       Punch the butterfly out of Blushing Bride card stock using the Bitty Butterfly Punch. Add the sequin using a Glue Dot.
5.       Add button, bow and butterfly. Glue Dots may work best to adhere these items.
6.       Tie tag onto bag


Tuesday, December 23, 2014

Terrific Tips Tuesday

Just a quick tip today. It's that time of year. You'll remember this card from our November Stamp Club. I wanted to remind you how fun and easy it is to use these framelits to make sentiments - if you follow one simple tip: Place a piece of wax paper between the framelit and the paper. This will make it so much easier to pop the paper out of the framelit. The framelit is also designed with little holes in it. Use the Paper Piercing Tool to push through and pop out the paper. So fun!!

I used the Expressions Thinlits Dies which are retire. But, you can find the words, "joy" and, "noel" in the Wonderful Wreath Framelits Dies. #135851 $24.95
Keep your eye out for new framelits coming soon in the Occasions Catalog (pg. 31)!

Paper Piercing Tool #126189 $3.95


Friday, December 19, 2014

Flashback Friday

Today we're flashing back to a couple Stamp Club projects from November 2010. We made a tin and Christmas tags that made the perfect little hand-made gift. While some of these items are retired, I hope you find inspiration here for those last-minute gifts.

We had our monthly club meeting in late November. With the holidays and the craziness of life I am finally getting around to sharing our project. Usually we make 1 card and 1 3-D object. This month we decided to make Christmas tags so I changed things up a bit. I had some tins that I had purchased from Stampin' Up's on-line clearance rack a while ago. I saw a picture of a decorated tin and it looked like someone had embossed the tin. So, I did a litle experimenting and found out that with a heat tool and clear embossing powder you can get this amazing look! How neat! So, we decorated this tin to put...


...these tags inside. I used several different stamp sets, inks, punches and paper. Stampin' Up makes projects like this so easy since everything coordinates!

Christmas Tags

Tuesday, December 16, 2014

Terrific Tips Tuesday

Today's tip is one I just learned and I am so excited to share it with you. I read it HERE on Mary Fish's Stampin' Pretty blog, so I have to give her total credit for this, but it is too good not to share (just in case you don't already follow her amazing blog).

You can check her blog out yourself; she even shared a helpful video. The tip she shares is a better way to store your photopolymer stamps. I have to be honest, I did not love the photopolymer stamps when Stampin' Up! first came out with them. There were various reasons, but one of my biggest complaints was trying to keep them in between the two plastic storage sheets they come in. Well, Mary's tip shows you how to put the sheet with the stamps' images printed on it in between the the case and the plastic that holds the front label. Simply stick it in using a glue dot in each corner, with the images facing out the back.

The stamps now easily stick to the plastic of the stamp case and since they are a reversed image, they will align with the image on the sheet you just adhered.
And, when you flip the case over, the images are the right direction - perfect for seeing the set inside!
I just have one more thing to add to this tip. It is the perfect help if you have a My Paper Pumpkin subscription. Each month you receive a photopolymer stamp set with your kit, and if you're like me, you have a whole bunch of nice little stamp sets. But, what to do with them? Well, now you can organize them (I put mine in different cases depending by images versus sentiments), store them and easily find them by using this tip.

Mini Glue Dots $4.95 #103683

Clear Mount Stamp Cases $5.95 #119105

Festival of Trees Photopolymer Stamp Set
$15.95 #135059

Friday, December 12, 2014

Flashback Friday

I loved this card so much when we made it at a Stamp Camp several years ago. I stumbled on the picture of it and I think I love it just as much. While some of the items we used originally are retired, I hope you find inspiration to create some equally (or more so) beautiful! We used Stampin' Write markers to color the stamp in order to get the two-toned effect of the flowers.

This first card is beautiful, I believe, for it's simplicity. The sample shows a "Thank-you" card, but the Just Believe stamp set also has the sentiments, "just for you" and "friends", so this is also a very versatile card.

 
Supplies:

Stamp Sets:
Just Believe

Paper:
Baja Breeze, Whisper White, Cajun Craze, Old Olive

Inks:
Cajun Craze
Old Olive and Riding Hood Red Stampin' Write Markers

Accessories:
Scallop Trim Border Punch

Tuesday, December 9, 2014

Terrific Tips Tuesday


This is such a fun tip! Go HERE now and check out Stampin' Up!'s year-end closeouts! Through January 5th, these items are reduced up to 80% off. Items are only available while supplies last, so don't wait! And, even better? You'll also find Christmas items on sale, too! Merry Christmas to YOU!

Friday, December 5, 2014

November Stamp Club Projects

It's not a flashback Friday, but I am going back a couple weeks to our November Club projects. With Thanksgiving and having family in, it's been a little busy around here, but I didn't want you to miss out on these cute projects!

This first project is an ornament card inspired by this card that I found on Pinterest.

Ornament Card
1.       To make the ornament, punch the card stock out with each smaller size using a lighter shade of card stock. The colors I used were: Cherry Cobbler, Real Red, Strawberry Slush and Blushing Bride. Adhere together as shown in the example.
2.       Punch the top and slightly below the top of the Ornament Punch out with the Champagne Glimmer Paper. Adhere to top of ornament ball using Tombow Liquid Adhesive.
3.       Adhere Gold Baker’s Twin to the back of the ornament. Adhere the ornament to the Crumb Cake card stock. Wrap twin around the top and back of the Crumb Cake card stock and adhere to the back. Adhere the Crumb Cake card stock to the Early Espresso card base.
4.       To cut out the Merry sentiment, layer it like you normally would with a framelit die (on top of the magnetic platform, in between two cutting pads), but put a piece of wax paper between the die and the Gold Foil Sheet. This will allow you to remove the sheet more easily from the die.
5.       Use a paper clip or paper piercer to pop out the sentiment and gently remove it from the die. Put the word through the Xyron sticker maker and adhere to card front.
6.       Add a sentiment to the Very Vanilla card stock and adhere inside card.

Snow Globe Ornament
1.       Use 1 ¾” Circle Punch to punch a hole in the middle of the Cherry Cobbler card stock.
2.       Use 2 3/8” Scallop Circle Punch to punch Cherry Cobbler card stock (lining up the circle you have already punched out in the center), Window Sheet and the Silver Glimmer Paper.
3.       Use the VersaMark pen to ink the snowman stamp, leaving out the, “To” and “From.” Shake the Pool Party Embossing Powder over the image and set with the Heat Tool.
4.       Punch out the snowman using the 1 ¾” Circle Punch.
5.       Lay the Glimmer Paper upside-down so the glimmer will become the back of your ornament.
6.       Using a tiny bit of adhesive to hold the ribbon in place, center it where you want it, at the top.
7.       Adhere snowman image.
8.       Remove the largest ring of the Shaker Frame from the backing sheet. To prevent the flakes from sticking to the top of the Shaker Frame, leave the top adhesive liner in place.
9.       Place the frame around the snowman image.
10.   Add a tiny pinch of Mica Flakes. If you add too much, it won’t have room to move around.
11.   Remove the top adhesive line from the Shaker Frame and adhere the Window sheet to the top.
12.   Using Tombow Liquid Adhesive, adhere the Cherry Cobbler Scallop Circle on top of the Window Sheet.

Tuesday, December 2, 2014

Terrific Tips Tuesday

First off, just a little reminder about Stampin' Up!'s Online Extravaganza! Don't miss out on some crazy good deals!


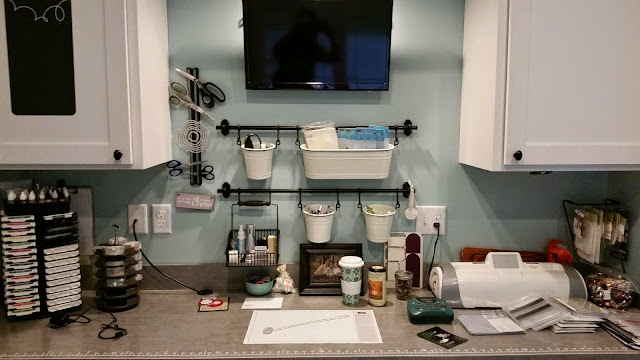
The next tip is a storage tip. I've seen other people do similar things, and I was so happy when I realized this would work in my craft room. I simply hung a magnetic knife holder on the wall and instantly had easier access to my scissors and other tools I use regularly. It is also a great way to either store your framelits or hold the set(s) you use the most or are using for a current project. 

How fun!

Here is a wider view of my work space. It's a little messy; I have a couple projects going on, plus I'm working on some other reorganization. Now that I've been here almost a year, I am finally figuring out a good flow for my work space. I wanted to see how I would like the knife holder before I bought two, but I will be buying another one for the right side of this space also. Asymmetry drives me a little nutty. ;)