Saturday, March 21, 2015

March Stamp Club Projects

We had our March Stamp Club meeting last week. I wanted something that said, "Spring!" and I think we found it.

First, we made this Swing Card using the Top Not Die with the Big Shot. I got this idea from Lynn Pratt on her blog. Click HERE for her instructions and step by step pictures. I typed my instructions below, based on hers.

Here is how the inside of the card looks:

Top-Note Swing Card
·         Begin with card stock cut to 8 ½” x 5 ½”. Fold in half to create a typical size card.
·         Lightly mark with a pencil at the halfway points of the top and right side of the front of the card. The top halfway point is 2 1/8” and the side halfway point is 2 ¾”.
·         Line up the Top Note Die with the card front. The center points on the die have been marked with a white gel pen. When you place the top cutting pad over your card front, don’t put it over the entire card. Line the edge up with the 2 1/8” line. The die will then only cut where the cutting pad covers, so you will have the shape of half the Top Note.
·         Use the Big Shot to cut the Whisper white. Trim just inside the score marks to create a layered effect.
·         Use the Oval Framelits to cut an oval from the remaining Whisper White. Use this inside the card.
·         To stamp the flower from the Lotus Blossom set, decided on your colors. We are using Calypso Coral and Blushing Bride for the flower and Old Olive and Pear Pizzazz for the stem.
o   There are 3 steps to the blossom and each stamp is numbered to make it easier. Number 3 must be the lightest color used.
o   Stamp #1 using Calypso Coral.
o   Stamp #2 using Calypso Coral stamped off one time. This means, stamp in on scrap paper first and then line it up with stamp #1 and stamp again. You will get a lighter shade of the Calypso Coral.
o   Stamp #3 using Blushing Bride.
o   I have found that it is easiest to line up the first two stamps by looking at the top of the flower image. Lining up #3 is easier if you want the lower leaves to line it up with #2.
·         Stamp the stem using Pear Pizzazz for the wider image and Old Olive for the accent image of the stem.
·         Add your sentiment and you’re done! 

We also made these cute treat holders. We used the Bow Builder Punch to create a flower on the front. I got the idea to add this flower from Connie Stewart at her blog, HERE.
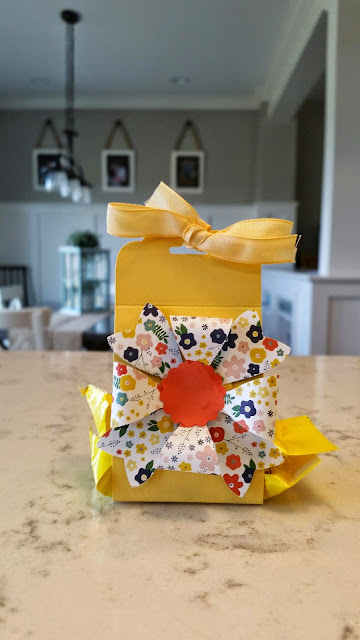
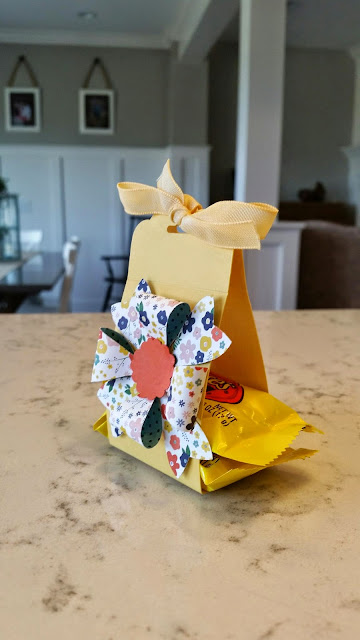

Easter Candy Holder & Bow Builder Punch Flower
·         Score 9 ½” x 2” Daffodil Delight card stock at 4” from each end. Punch each end using the Scallop Tag Topper Punch, then score each end at 1 ¼”.
·         Punch patterned paper (Flower Pot Designer Series Paper) 4 times using the Bow Builder Punch.
·         Punch a scrap of Daffodil Delight card stock with a 1” Circle Punch.
·         Glue the 4 whale tale shapes from the Bow Builder Punch across from each other around the 1” circle.
·         Curl each bow piece around to give it shape and glue ends together using Glue Dots. Add to circle between the whale tales using either Glue Dots or Tombow Liquid Adhesive.
·         Punch a scrap of Tangerine Tango card stock using 7/8” Scallop Circle Punch. Glue to the center of the ribbon/flower.
·         Glue flower to the front of the candy holder using large Glue Dots.
·         Adhere candy inside using Glue Dots or a tape runner.
·         Tie closed with ribbon.

Thursday, March 19, 2015

Birthday Boy

My nephew had a birthday this week, and I love sending all my nieces and nephews (there's 18 of them!) birthday cards. I didn't have one that I thought a 9 year old boy would love, so I threw this card together. I was inspired by a card that that had a circle cut out in the background paper and a stamped image on a smaller circle. I thought a star would be perfect for a boy, along with red, blues and arrows. Throw those ingredients together and I think you'll have one happy birthday boy!

Tuesday, March 17, 2015

Shaking things up with My Paper Pumpkin

I'm a little behind on the My Paper Pumpkin kits I get in the mail. January and February have been unusually busy months for our family. But I needed some cards quick, so I happily pulled out one of the MPP kits I received recently. And what fun! It's hard to tell, but by using dimensional strips I was able to make a shaker style card with confetti behind the frame. I just know these card will put smiles on the faces of whoever receives them!


Friday, March 13, 2015

Stamp Camp Sneak Peak #4

Now this card makes me think of Spring! Aren't you ready for Spring? I just love this color combination! And that bow just makes my day!

Supplies Used:

Stamp Set:
Banner Blessings 

Paper:
Calypso Coral
Garden Green
Crisp Cantaloupe
Pistachio Pudding
Whisper White
Gold Soiree Specialty Designer Series Paper

Ink:
Calypso Coral
Garden Green

Accessories:
Bow Builder Punch
Lace Paper Doilies
Glue Dots


Thursday, March 12, 2015

Stamp Camp Sneak Peak #3

I just love this card! Really, I love the stamp set, Tap Tap Tap. I used to love playing on my grandma's electric typewriter when I was a little girl. I typed and typed. Sometimes I made up stories. Sometimes I typed gibberish. Anything to feel the click, click, click under my fingertips. This set just makes me happy!

Supplied Used:

Stamp Set:
Tap Tap Tap

Paper:
Bermuda Bay
Basic Black
Very Vanilla
Typeset Designer Specialty Designer Series Paper

Ink:
Bermuda Bay
Basic Black
Sahara Sand

Accessories:
Spiral Border Punch

Wednesday, March 11, 2015

Stamp Camp Sneak Peak #2

Just looking at this card takes me to a happy place. You can imagine telling sweet secrets to a childhood friend under this tree. You can almost feel the wind blowing through your hair as you swing back and forth.

Supplies Used

Stamp Set:
Sheltering Tree

Paper:
Pear Pizzazz
Whisper White
Strawberry Slush

Ink:
Pear Pizzazz
Chocolate Chip
Strawberry Slush

Accessories:
Jewels Basic Pearl
Small Heart Punch
Dimensionals

Tuesday, March 10, 2015

Stamp Camp Sneak Peak #1

It's been awhile since I've had a Stamp Camp - it's time!

Sadly, I have needed quite a few sympathy cards in the last few months and I have already gotten requests to make some at Stamp Camp. I love this card because it is beautiful but simple. That means it is also respectful to the occasion and keeps the card from detracting from the message.

Supplies Used:

Stamp Sets:
Lovely as a Tree
Teeny Tiny Wishes

Paper:
Lost Lagoon
Early Espresso
Whisper White

Ink:
Early Espresso
Lost Lagoon

Accessories:
Sponge

Sunday, March 1, 2015

Even more to love about Sale-A-Bration!

Sometimes I think Sale-A-Bration is Stamin' Up!'s most wonderful time of the year. And now, Stampin' Up is making it even better! Starting today, March 1st, Stamin' Up! is adding 4 new items that you can earn for free during Sale-A-Bration! Check out the flyers below for more details!