Reminder, nudge, whatever. If you haven't tried My Paper Pumpkin yet, I really think you're missing out. :) I've already shared my thoughts (here) on the projects. I'd love to help you with any questions you might have, but until then, I'll leave you with a fun video sharing what you can do with the June kit:

Thursday, June 27, 2013
Wednesday, June 26, 2013
Ready. Set. Send!

I know you come here for card-making ideas and tips. But sometimes you just don't have the time necessary to make these beautiful projects to share with others. And sometimes you just really need to get that note sent, the birthday wished, or the "thank-you" said. You need a card. Now. Well, for a limited time, Stampin' Up! has just the kit for you: Ready. Set. Send. (Item #133384 $19.95) In it, you'll receive 5 birthday cards, 5 thank you cards and 10 Whisper White envelopes, all ready for you to write that quick note and send them off. Supplies are limited, so if this is something you could use in your crazy, busy life, order now!
Tuesday, June 25, 2013
Tuesday Tips Tuesday
I just love stamps. Not surprised, are you? Of course I love stamps. And like all stamp lovers (and, let's face it, crafters in general) I have my preferences. When clear mounted stamps first came out years ago I wanted so badly to like them. I just couldn't. There was something about that clear, crisp image you get with Stampin' Up!'s stamps that kept winning out over any clear stamp I tried. Then, a couple years ago, Stampin' Up! came out with their own version of clear stamps. They aren't completely clear, but when you mount the rubber image on a clear block you have the best of both worlds with a crisp image and the ability to see right where you're stamping. However, I just keep going back to my wood mounted stamps. There's something about them I love. Maybe it's the fact I can pull them right out of the case, dip them and ink and use them right away. Maybe it's akin to still needing to flip through pages in a book rather than sliding my finger across a tablet. I don't know. But then there's the organization-obsessed part of me that loves how easy it is to store Stampin' Up!'s clear stamps in their DVD shaped cases. *LOVE* Well, Stampin' Up! has pulled through again. Now all wood-mounted stamp sets will come in one of two sizes of boxes, one exactly half the size of the other. Sweet. And I just got my first set this week:

*Swoon*

Even better? You can buy empty sets of these cases. Not only can you revamp your wood-mounted stamp storage system (tops on my to-do list, of course), but you can also use these cases for storing all sorts of other things: Small punches, glue dots, Basic Jewels, and Stampin' Write Markers fit perfectly. You can sort them by color family and label the spine for quick retrieval. You can keep cards in here or those must-have items you carry with you at all times (for me, it would be my paper snips, bone folder and tape runner). Is your mind whirring with all you could use the new cases for, yet? You can label the spine, fill the front with DSP for a beautiful, coordinated look, or let your stamps do the talking. Really, the options are limitless! Make sure these are on your Wish List before you place your next order!


Saturday, June 22, 2013
A favorite for my father
For someone who loves to make and send cards, it seems like I am way too often putting a card together at the last minute. I found myself doing just that last weekend for my dad and father-in-law for Father's Day.
This card has a simple layout which made it easy to throw together, but it has a nice, clean, crisp look. And, I got to use one of my favorite stamp sets, The Open Sea. I am always looking for reasons to use this set and I love how this card turned out. Remember that whenever you have to make a card, it's always a good idea to make two. Since you generally use half of an 8.5x11 piece of card stock, go ahead and use both halves. You end up with a card for the upcoming occasion and an extra for the next time with little extra work.

The Open Sea
128454 (WM)
123032 (CM)

Tuesday, June 18, 2013
Terrific Tips Tuesday
Hello again! Are you ready for another tip? I'm mixing this tip with another one of my favorite products.
Have you tried the Essentials Paper Piercing Pack (126187) yet? This tool was redesigned for the 2012-2013 Annual Catalog and has been joined by some new friends in the year since. These new friends are different versions with even more shapes that coordinated with Stampin' Up! dies and stamp images.
I started out with the older version that was similar to what you see on the bottom mat. The other two mats complete the essential set by giving you some basic shape and label options.

The Paper Piercing Tool (126189) is one you will want to keep in your stash nearby. Not only is it made to work with the paper piercing packs, but it is a help with many different types of projects. The tip is extremely sharp, so be careful!

Be sure to get the Stampin' Pierce Mat (126199) to use with the Stampin' Pierce Tool. It will protect your stamping surface from the sharp tip and give you something to pierce into behind your project. It is also a great surface to have under your project when you are stamping, to give even coverage. I wish I had my mat on hand at my last Stamp Camp. The long, plastic folding tables were giving us no end of grief with their slightly wavey surface. This would have solved our problem of an uneven stamped image perfectly!

Besides creating outline images to add texture and detail to your project, you can use the holes near the ruler end to make sure your brads are lined up. Simply sandwich the card stock between the mat and the piercing template and poke holes in every two or three spots, leaving room for the brads. No more marking with a pencil and hoping you punch in the right place! No more guesswork!
You can also give your project a stitched look by simply playing connect the dots with a white Gel Pen. No needle or thread necessary! Try it today and let me know what you think!

Tuesday, June 11, 2013
Terrific Tips Tuesday
Hello again! Last Tuesday I believe I said my computer was finally back. Guess what? It was back, but not fully functioning. After some back and forth I think it might be back for good. But I've had to wipe everything off of it and start over. So, here I am once again down to my deadline on Tuesday for my tips blog. I have been re-installing software and updates all day (along with trying to keep 3 kids busy on their Summer break). I thought about pushing this blog off until tomorrow, but I wanted to share two tips really quickly.
First, make sure you back up your computer! Thankfully I did, so I'm just working at getting things back the way they should be. If I hadn't, though, I would be in a big mess. So I'll say it again: Back up your computer!
Second, if you have My Digital Studio, don't miss out on the HUGE 25% off sale! It ends on June 15th. I've been working hard to get MDS back on my computer because I actually had a pretty big order to place before my computer crashed. Check HERE for a list of the sale prices on the print products. And, if you have any projects you've been putting off ordering, now is the time!
Friday, June 7, 2013
Small thanks for big blessings
I was waiting until school was out to share the end of year cards I made for the kids' teachers. It's been out a week now, and we haven't stopped! I thought today I'd better just sit down and get this post written.
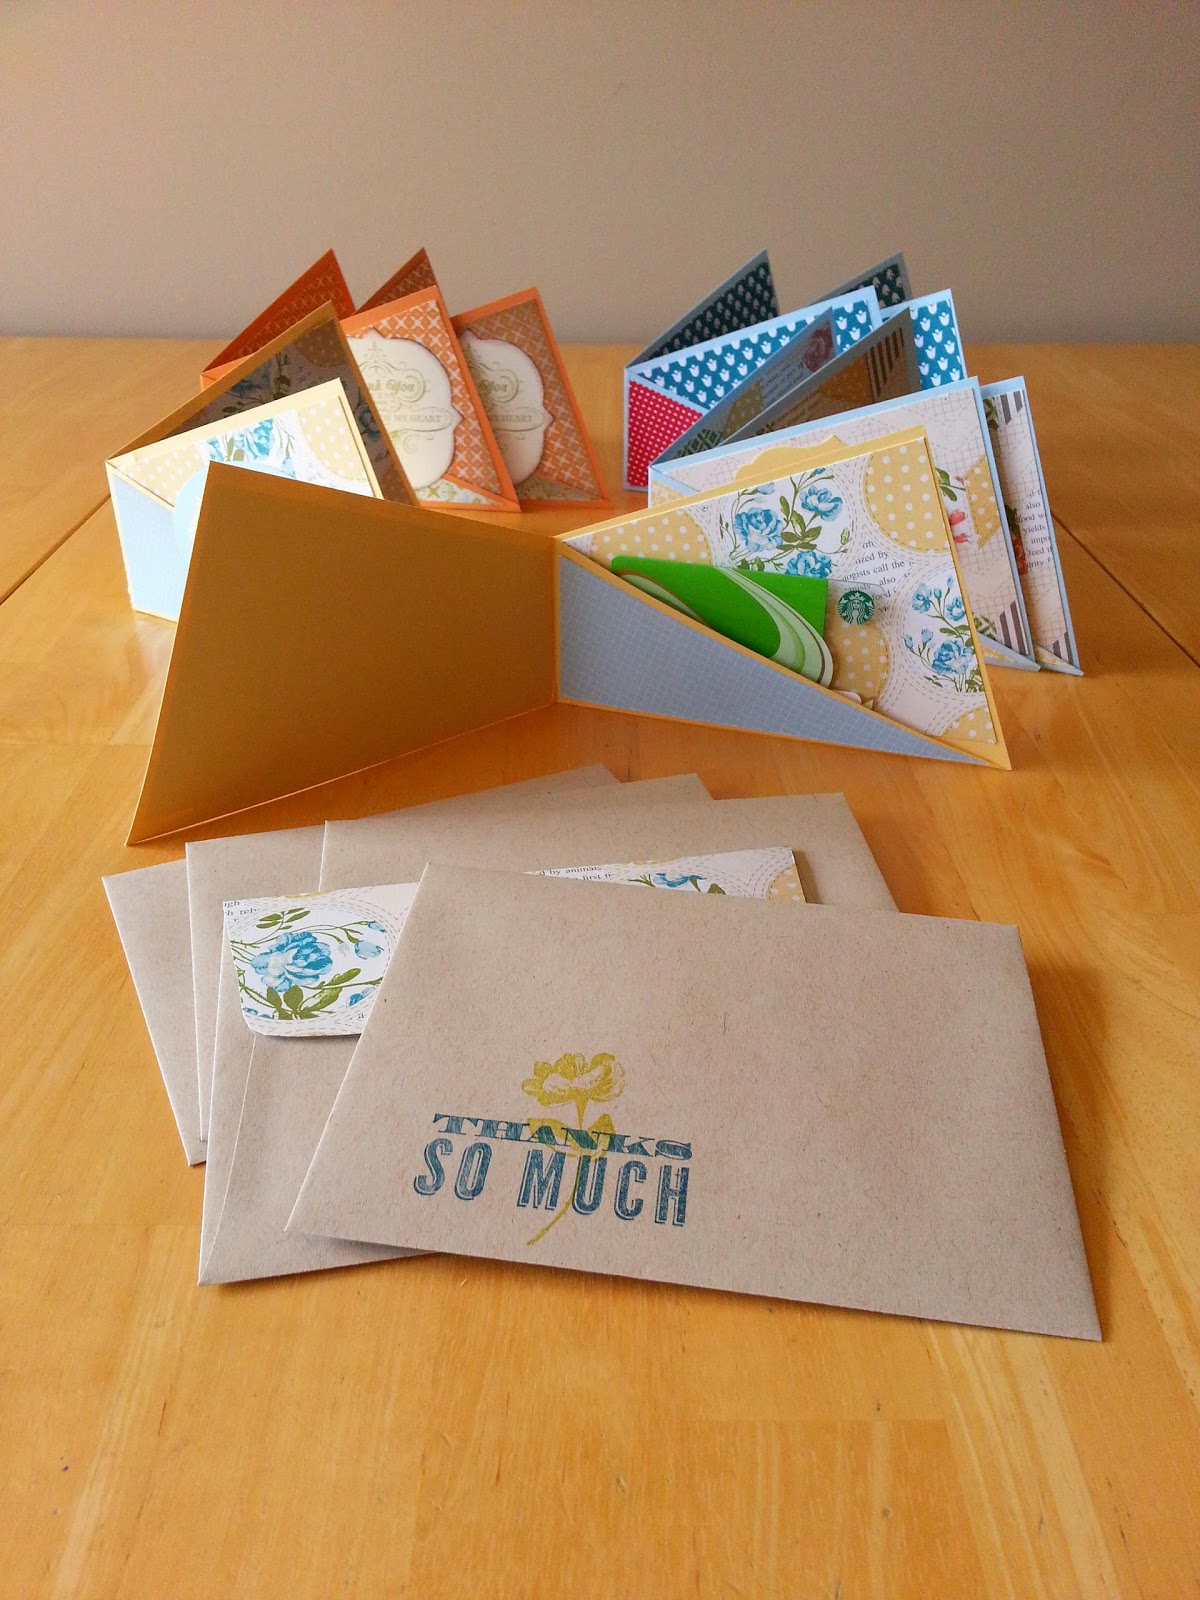
Considering we had 9 teachers, teachers aids and a school nurse to give to (we figured the school nurse earned a huge thank-you after my daughter's daily visits!), I kept the thank-you's simple. I made Twisted Greeting Card Holders and you can watch a great video HERE.

We actually made these cards a few months ago with my Stamp Club. I loved how simple these cards are, and yet they look pretty complicated. And when you open them up, there's a pocket - perfect for a gift card! I added coordinating DSP to the envelope flaps for a beautiful finish. We sure did have some great teachers this year and it was really hard to say, "Good-bye". Thankfully, we'll still see them around, which makes saying good-bye for the summer a little easier.
Tuesday, June 4, 2013
Terrific Tips Tuesday
I have been waiting for the release of the new catalog to share this tip with you. First off, if you haven't heard me say it yet, my favorite tool is the Big Shot.

I find I use it with almost every card I make. I love all the different cutting dies, the effects they can have on a card or project and I especially love how Stampin' Up! has exclusive dies that coordinate with their stamps. One of the newer accessories with the Big Shot are the Framelits. If you haven't tried them yet, you should! There are so many options! Some people, though, have a problem getting them to stay still when lining them up with a stamped image and running them through the Big Shot. There are several ways people have come up with to overcome this dilemma, including using painter's tape or Post-It notes to hold the Framelit in place. Well, here's my big tip:
Stampin' Up! has a solution! It's called the Magnetic Platform and it will hold your Framelits and Edgelits in place while you cut!

130658 $39.95
Add it to your wish list today!
Subscribe to:
Posts (Atom)