Tuesday, April 29, 2014

Terrific Tips Tuesday

Have you tried My Paper Pumpkin yet? It's your paper crafting fairy godmother, magically sending a kit with supplies for different projects to your door each month. All the supplies are ready to go, so you can get creative right away! So fun! 


And here's more great news: Current My Paper Pumpkin subscribers can purchase past kits or refill kits while supplies last! Did you love a kit? Miss a kit? This is for you! And Stampin' Up! just added 4 new kits to the offering, so check it out HERE today!


Not sure yet about My Paper Pumpkin? You can see and order a trial kit HERE.

Friday, April 25, 2014

Flashback Friday

Today's Flashback is a much more recent memory. I wanted to share this card because it is one of my favorites and the stamp set, Oh, Hello is retiring. This year, Stampin' Up! is doing things a little differently. Not only will the retiring accessories only be available while supplies last, but the same is true now for the stamps. So, if there's something you have had your eye on, don't miss out! Order now before it's too late. And, what better incentive is there than FREE SHIPPING which ends today?!

This card is from Stamp Camp just last May. Do you remember it? 


It also inspired this card, using the Oh, Hello stamp set:
I think you can see why it's one of my favorites!

Check out the items that will be retiring HERE

Tuesday, April 22, 2014

Terrific Tips Tuesday

It's that time of year again, the time of year when we look forward to the new Stampin' Up! Annual Catalog! But first, we have to say good-bye to some old friends. Don't miss out on the retiring stamp and accessories before they are gone for good! And take advantage of the FREE SHIPPING on all orders this week only!

Monday, April 21, 2014

FREE SHIPPING!


It really is something to shout about!
Dates: April 21-25, 2014
FREE shipping on EVERYTHING (excluding expedited orders)
Your Next Steps
  • Stock up on all the supplies you need for the next while-free shipping doesn't come around very often!
  • Don't miss out on the retiring products - and get them with free shipping! 
A Few Reminders
  • There are no minimums or limits.
  • All order types qualify (customer, demonstrator, workshop, online). 
  • Expedited orders are not included in this promotion.

Friday, April 18, 2014

Flashback Friday

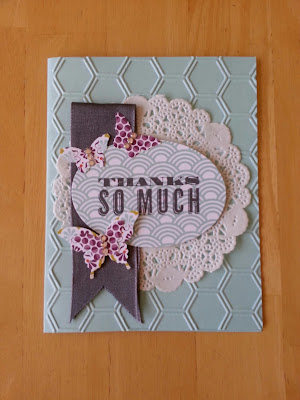
This card and Post-It holder were the project we made for Stamp Club a little over a year ago. I wanted to share it with you because the projects would make great year-end teacher gifts. Also, Administrative Assistant Day is next Wednesday, April 23 and this would also be a nice little gift - especially if it is accompanied by a nice gift card and some flowers. ;) 

 I got the idea straight from Stampin' Up! CEO and co-founder Shelli Gardner on her blog, here. All I did was change up the layering a bit (this allowed for my Club ladies to play around with the sentiment if they wanted) and the colors. I don't know yet who will get this card, but I am sure they will know I how thankful I am for their kind deed. 
Supplies: Ticket Corner Punch, Dimensionals. Sticky Strip, Score Tool, Big Shot, Polkadots Embossing Folder, Framelits Window Frame Collection, Perfect Plum Ink, From My Heart stamp set, Crumb Cake, Perfect Plum, Wild Wasabi and Very Vanilla card stock, Wild Wasabi Stitched Grosgrain Ribbon
Here is a picture of the inside of the card. I also created a version with a smaller Window Frame Framelit shape inside. The detail was beautiful!
The next project was something I created for the Ladies Open House I recently took part in. These cute Post-It Note holders sold out and I knew I had a winning project. I can't take credit for it, though, since I found the idea for this on Pinterest. Simply pick your favorite designer series paper, cut it to fit in a 4"x6" clear acrylic picture frame, add whatever details you desire and adhere a Post-It Note pad with Sticky Strip. And, if you want a new look, all you have to do is flip to the opposite side of designer series paper! Fun!
Supplies: 4" x 6" Acrylic Picture Frame, 3" x 3" Sticky Notes, Large Oval Punch, Decorative Label Punch, Notes & Details and Four Frames stamp sets, Early Espresso Ink, Crumb Cake, Very Vanilla, and Whisper White card stock, Sticky Strip

Tuesday, April 15, 2014

Attention Scrapbookers!

I am so excited to share a new partnership between Stampin' Up! and Project Life! If you love scrapbooking or if you wish you had time for it, you'll be excited, too! 

If you haven't heard of Project Life before, it's a simple system that allows you to slip your pictures into Photo Pocket Pages and, if you like, add designed cards to journal on or finish your page. It's so easy! And all the accessories fit in a handy box right on your desk. If you're still curious, check out this helpful video:


You will be able to order a limited selection of Project Life products on May 1st. The full line will be available with the new catalog, starting June 2nd.

Some reasons you'll love the Project Life collection:
  • Coordination, coordination, coordination. You know we do it best, and our Project Life line is no exception. 
  • Our products center on things that matter most-weddings, babies, kids, and the everyday moments of getting together with your favorite people-all things that need to be remembered.
  • Our card collections come without rounded corners so you can decide if you want to keep them that way (and match the corners of your photos as they come) or use our Project Life Corner Punch to round them out. 
  • Our card collections come packaged in an exclusive storage system that holds all your Project Life supplies on your desk: cards, journaling pens, photos, accessory packs, stamp sets, and more.

Terrific Tips Tuesday

Today's tip is about adhesive, or rather, having the right adhesive on hand. I went on a short scrapbooking weekend with some friends this weekend and put together a This and That album using the pictures I took as we built our home. I brought the basics since the supplies that coordinate with the This and That products covered most of what I needed. For adhesive, I brought my trusty SNAIL. I found, though, that I missed having some different adhesive options on hand. The two types I wish I had brought for this project were:

I was trying to put a small bow on a page and the snail wasn't cutting it. Glue dots are perfect for this job, along with adhering buttons and other small accessories to your project.

The Glue Pen is helpful in several different ways. First, it's great to use to put the adhesive right where you want it, especially in small spaces like cut out letters. Second, I use it as a repositionable adhesive for my clear stamps. I rub a little on the back of the stamps and let it dry. Once dry, it's tacky, but not a permanent adhesive, giving it the perfect cling to hold onto any clear block.

Friday, April 11, 2014

Flashback Friday

Today's Flashback is one of my favorite cards. It's simple but elegant which I always think is a sign of a good card. We made it originally for a February stamp camp and it would make a great wedding or anniversary card.

Stamp Sets:
Elements of Style
Paper:
Basic Black
Very Vanilla
Real Red
Newsprint DSP
Inks:
Basic Black
Accessories:
Real Red Satin Ribbon
Big Shot & Lattice Embossing Folder

Tuesday, April 8, 2014

Terrific Tips Tuesday

Hello Friends! I stumbled across a great site online the other day with some really helpful advice about which inks works best for which projects. Beginner or pro, there's something to learn here and maybe even an idea for a new project will be sparked. Check it out HERE! Enjoy!

Friday, April 4, 2014

Flashback Friday

As I was looking through pictures of past projects, I found the one I'm going to share with you today. We originally made these at a January Stamp Club meeting, with Valentine's Day in mind. I think these two projects are adorable and could be used for many other occasions, too, so I had to share!


I used the Petite Pocket Die for our 3-D project, adding a little treat in our 1"x8" Cellophane Bags. This beautiful card is made all the more striking by using Stampin' Up!'s Core-dinations card stock. Once it's run through the Big Shot in an embossing folder you can sand it down so a different color shows through giving it a beautiful, aged look.

Both projects use many new products from the Spring Catalog. The envelope is made using the Tea For Two Designer Series Paper and wrapped in a Paper Doilie. The scallop heart (in Lucky Limeade) was made using the Hearts a Flutter Framelits.

The card also uses the Hearts a Flutter Framelits, along with the coordinating Hearts a Flutter Stamp set and the new Bitty Butterfly Punch. And, don't miss: The Petite Curly Label Punch! It's one of the items you can get for FREE during Sale-A-Bration just by spending $50. Fun! The coordinating stamp, Caio Baby!, is also from the Spring Catalog. And, don't miss the subtle touch of the Needlepoint Border Embossing folder on the Very Vanilla behind the banner. I think I have a new favorite!

Tuesday, April 1, 2014

Terrific Tips Tuesday

Today's tip is a fun stamping technique called, "kissing." I have a fun video from the folks at Stampin' Up! that will show you how easy this technique can be and how it can add that special something to your stamped projects.