Haven't you just loved this year's Holiday Catalog? There were so many great new products and projects inside that I know I will be revisiting it for a while. Well, today's tip is an important one: Don't miss out! The items in the Holiday Catalog will only be available until this Thursday, January 2nd. Click on the "Shop Now" button on the left to go to my online store to grab any last minute items you don't want to miss out on!

Tuesday, December 31, 2013
Friday, December 27, 2013
Flashback Friday
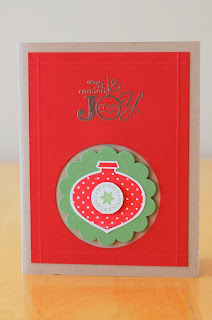
I know we are already looking at Christmas in the rear view mirror, but I have one more card to share with you. If you like it, pin it and remember it for next year! Enjoy!
I had so much fun creating this final card for Stamp Camp. It's very simple but the details make it. The key to this card: Punches. The card centers around the 2 1/2" circle punch right in the bottom middle of the Riding Hood Red card stock. All I did was center the punch at the bottom of the card stock and punch it out. Then the 2 3/8" Scallop Circle, 3/4" Circle and Ornament punches layer nicely on top. Using Pewter embossing powder for the Tidings of Comfort and Joy sentiment at the top along with the Simply Scorin' Tool add texture.
I had so much fun creating this final card for Stamp Camp. It's very simple but the details make it. The key to this card: Punches. The card centers around the 2 1/2" circle punch right in the bottom middle of the Riding Hood Red card stock. All I did was center the punch at the bottom of the card stock and punch it out. Then the 2 3/8" Scallop Circle, 3/4" Circle and Ornament punches layer nicely on top. Using Pewter embossing powder for the Tidings of Comfort and Joy sentiment at the top along with the Simply Scorin' Tool add texture.

Stamp Sets:
Delightful Decorations, Word Play
Paper:
Crumb Cake, Riding Hood Red, Wild Wasabi, Whisper White
Ink:
Wild Wasabi, Riding Hood Red, VersaMark
Accessories:
Heat Tool and Pewter Embossing Powder, 2 3/8" Scallop Circle punch, 2 1/2" Circle punch, 3/4" Circle punch, Ornament punch, Dimensionals, Scorin' Tool
Tuesday, December 24, 2013
Terrific Tips Tuesday
Today's tip, in the middle of this hurried holiday season: Keep it simple!
I'm a planner, which means I've had my cards planned and made for a while now (getting them addressed and mailed was a different story this year!). I know how many I need and who I need them for. But life is always good at throwing us curve balls and I realized last week that I would need a few more cards for my husband to take around to his clients with gift baskets. We are busy not only with the Christmas season and all the activities 3 kids bring along with them, but we are also getting ready to move. I just don't have time right now for an extra card-making session! So, I kept it simple. With a basic background patterned paper (Season of Style Designer Series Paper Stack) as a jumping off point for color, I was able to easily throw these cards together. Deco Labels Framelits Dies nest perfectly to give me a border around the stamped image. I just love this log cabin from the Christmas Lodge set from last year. Add a little sponging around the edges for detail and - viola - done! You can quickly make a cute little stack of cards with this method. Not only will this be helpful for those last-minute cards you might need, but making a set of cards like this would also be a great gift this holiday season. You may not be the only one in search of that last-minute card.
This tip works for any occasion you might have come up. All you have to do is pick the DSP and change up the central image and this layout - or one similar - will keep you supplied with cards throughout the year! Remember, I love to see how people CASE (copy and share everything) my cards and change things up to suit themselves! Please share your ideas, too!

Friday, December 20, 2013
Flashback Friday
This card is just plain cute! Check out the Stylin' Snowfolk stamp set (Retired) and all the options you have. You can accessorize your snowman (or snow-woman!) almost any way you can imagine!
This set retired, but if you love the look, check out the Snow Day stamp set on page 25 of the Holiday Catalog. It's adorable! (W 131892 $26.95 C 131895 $18.95)

This set retired, but if you love the look, check out the Snow Day stamp set on page 25 of the Holiday Catalog. It's adorable! (W 131892 $26.95 C 131895 $18.95)

Stamp Sets:
Stylin' Snowfolk, Border Banter
Paper:
Bashful Blue, Gumball Green, Whisper White
Inks:
Bashful Blue, Gumball Green, Soft Suede, Pumpkin Pie, Basic Black
Accessories:
Dimensionals, Scallop Border Punch
Tuesday, December 17, 2013
Terrific Tips Tuesday
Christmas is right around the corner. I finally got my cards mailed last week, much later than I usually send them. I thought you might like a little reminder of some of the last dates to send your cards and packages, according the the United States Post Office:
- Last day to ship Standard Post was Saturday, Dec. 14.
- Last day to ship to most military posts is today, Tuesday, Dec. 17.
- Last day for most international shipping is Wednesday, Dec. 18.
- First-class mail needs to be sent by Friday, Dec. 20.
- Priority Mail Flat-Rate mailings need to go out by Saturday, Dec. 21.
- Priority Mail Express needs to be shipped by Monday, Dec. 23.
Don't forget that sometimes hand delivering a Christmas card may bring the most joy to both the giver and the receiver!
Friday, December 13, 2013
Flashback Friday
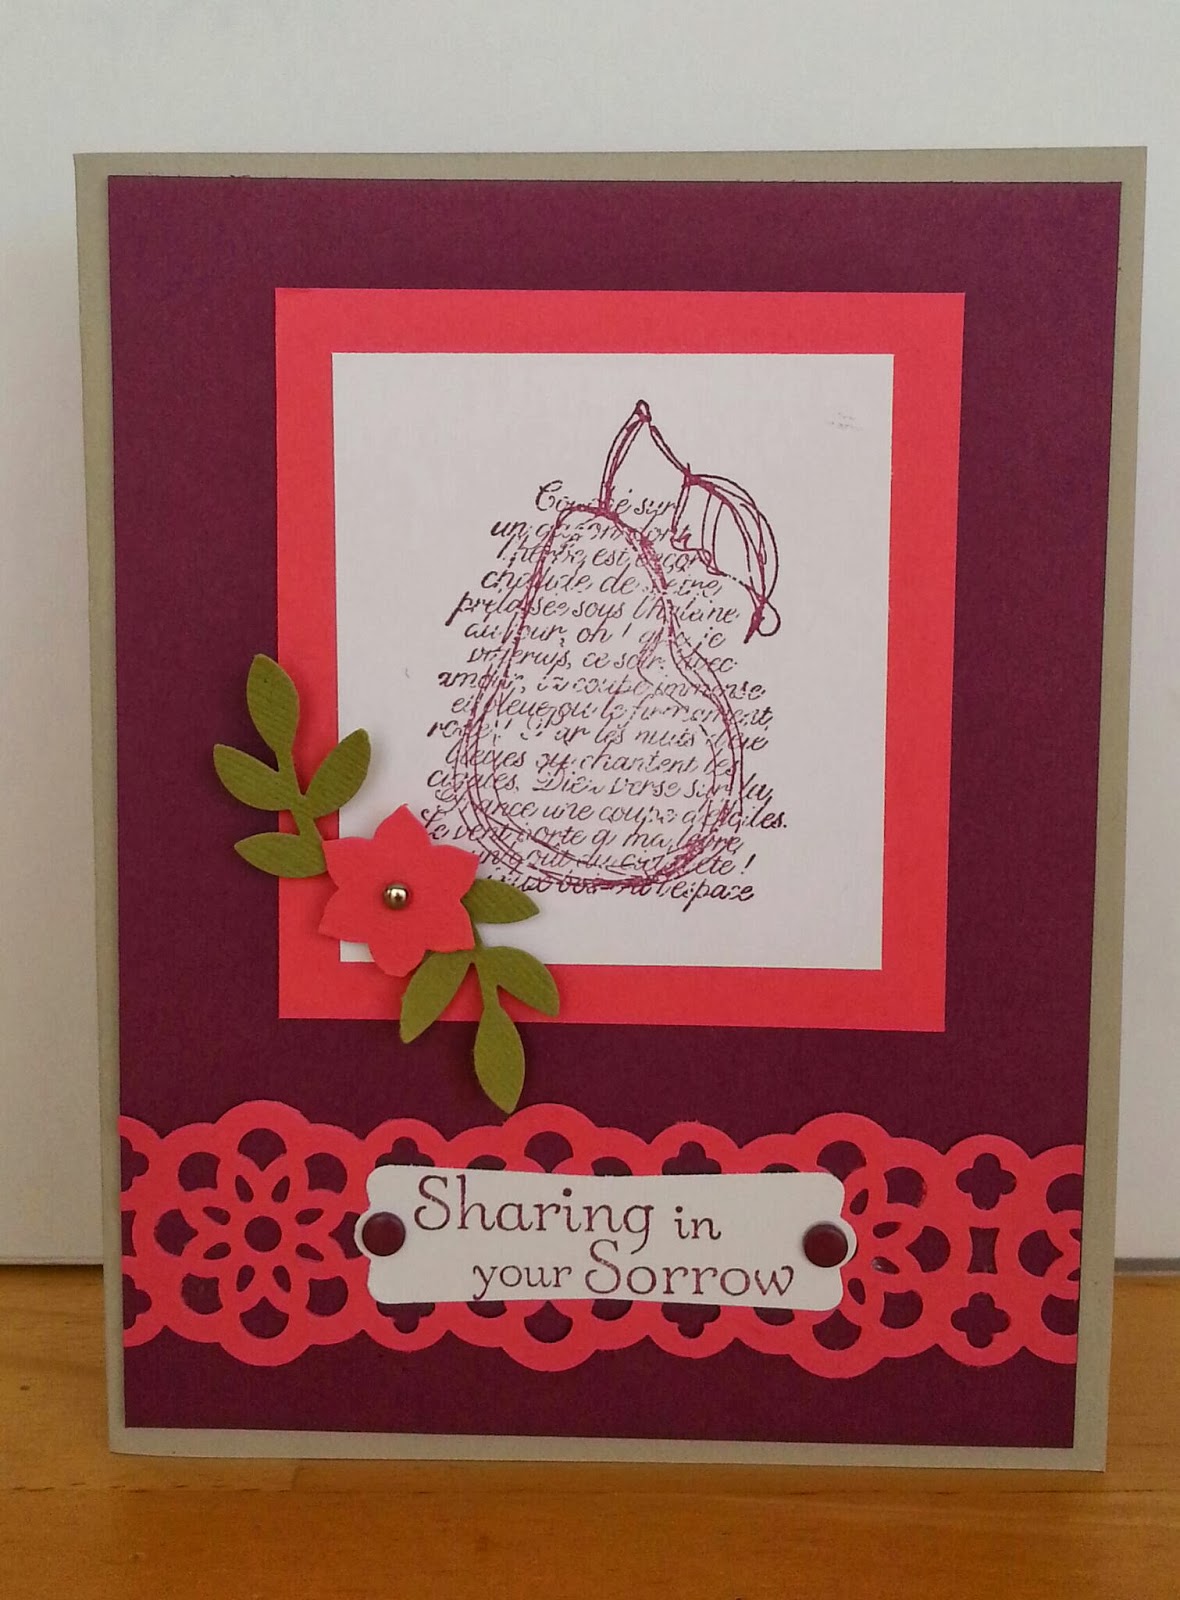
The next card is simple but turned out beautifully. I "CASED" this from another demonstrator. You can see her version of the card HERE. CASE stands for "copy and share everything". You will see subtle differences in our cards. People often ask me where I get ideas for cards. The answer is: Everywhere. Sometimes it starts from a color combination I see somewhere, sometimes the stamp set itself inspires me. And often I see a card someone else has made and I try to recreate it with my own spin. To be honest, I love it when I see what the ladies at my Stamp Camps come up with as variations to my cards. Our Creator created very creative people and I love that!


Products Used:
Stamps:
Four the Holidays, Northern Hearts
Paper:
Cherry Cobbler, Sahara Sand, Whisper White
Ink:
Sahara Sand
Accessories:
Big Shot & Framed Tulip Embossing Folder, Dotted Scallop Ribbon Border Punch, Basic Rhinestones
Thursday, December 12, 2013
New Photopolymer Stamp Sets!
Stampin' Up! has released two new photopolymer stamp sets. They are here just in time for planning ahead for Valentine's Day, but the countless sayings in these sets make them useful all year long. Check it out:

Tuesday, December 10, 2013
Terrific Tips Tuesday
Today's tip is an exciting one - go check out the Clearance Rack! Starting today many retired products will be on sale for up to 80% off! Hurry over and check out the selection - items will only be available while supplies last!
Friday, December 6, 2013
Flashback Friday
I have been thinking it's time to revisit Flashback Fridays. I often go back to cards I've made in the past for inspiration, so it's my hope that you'll find inspiration in them, too.
The temperatures are dropping and the days are getting shorter. It must mean it's almost time for Christmas! And with Christmas comes Christmas cards, so I thought I'd revisit the Stamp Camp cards we made last year this month.
I am so excited about this first card for several reasons. First of all, the stamp set Evergreen looks simple but offers many options. There is a solid evergreen tree background, an outline stamp of the tree and a shape of the tree in script with the words to Silent Night. It also has a perfect sentiment for inside the card. You have your Christmas card basics covered with Evergreen (W 127970 $25.95, C 127973 $18.95). I made two cards to show some of the ways you can make this card your own. You can also play around with the ink colors you use for the layers. On the left, I used Certainly Celery for the solid image and Old Olive for the outlined image. On the right I used Certainly Celery for the solid image again but Chocolate Chip for the words. You could play around with those colors, or any others for that matter, in almost any combination.


Supplies:
Stamp Set:
Evergreen
Paper:
Chocolate Chip, Old Olive, Raspberry Ripple, Very Vanilla
Inks:
Old Olive, Certainly Celery, Chocolate Chip
Accessories:
Star Punch from the Merry Minis Punch Pack, Champagne Glitter Paper, Big Shot & Woodgrain Embossing Folder, Baker's Twine, Glue Dots, Naturals Designer Buttons
Thursday, December 5, 2013
Christmas Tags
I recently threw these tags together to add a sweet touch to some Christmas gift bags.
The Window Frames Framelits Dies seemed like a perfect shape to frame a simple Christmas sentiment using That's the Ticket stamp set, the coordinating Ticket Duo Punch and the Label Love Bundle with the coordinating stamp set and punch. A little added texture from the Burlap Ribbon adds the perfect touch.

Tuesday, December 3, 2013
Terrific Tips Tuesday
Today's tip is brought to you again by the Annual Catalog. After many requests, Stampin' Up! added the name of some of the colors used in their sample pictures in the catalog. Now you don't have to go searching to figure out what colors to use if you see a project you like. Check it out! The catalog is an absolutely great place to go to find inspiration for all sorts of projects.
If you are still struggling with what colors to use or which colors coordinate and work well together, don't forget about the Color Coach. This is probably one of my all-time favorite "handy helpers". It is a swatchbook with every color in Stampin' Up!'s color collections. You can even add a pack of each of the In-Colors if you like. Each color swatch has a cheat sheet on the back giving you some color combination suggestions. There are even a couple cards where you can keep track of your own favorite color combinations.

Sunday, December 1, 2013
A Whole Lot of Love!
Now that you've gotten started on your holiday preparations, it's time to start thinking ahead - to Valentine's Day! Too much, you say? A little early, you say? Well, that's why Stampin' Up! is here to help. With the Whole Lot of Love product family, you will find everything you need to get creative for Valentine's Day all in one place. Click HERE for more information and to get a head start today! Then, you can sit back and enjoy all your holidays to come for the next several months!


December's "Best of" stamp set is now available!
It's time to share the final "Best of" stamp set. It's been so fun to remember the various stamp sets these images have come from all year. As we look forward to Stampin' Up!'s biggest promotion, Sale-a-bration, starting in January, we can remember stamps from Sale-a-brations past. Each stamp in this set is from a past Sale-a-bration set. The best part? You don't even have to spend $50 to earn it! Click below for more information.

Tuesday, November 26, 2013
Terrific Tips Tuesday
Today's Tuesday Tip is brought to you by a sympathy I had to make recently. As I was assembling the pieces, I needed something to anchor the sentiment. Sometimes, though, brads just don't cut it because their prongs can stick out of delicate embellishments. That's where Stampin' Up!'s Candy Dots come to the rescue! And with a pack for each color family, you are sure to have exactly what you need right at your fingertips. But wait - there's more! Candy Dot are super simple to use: just peal and stick! And, if you're missing the look of brads, or need something to help hold your project together, you can add a Candy Dot to a Brad Base for fast coordination!

Wednesday, November 20, 2013
Are you ready for a Holiday Sale?
It's that time of year again! And Stampin' Up! has got your back! Check the online store today for great deals and 24-hour door-busters!

Here's are all the details:
- This sale is the same as the annual Online Extravaganza sale of years past--just with a simpler name.
- Discounts range between 20 and 50 percent-awesome!
- Discounted products are available on all order types (customer, demonstrator, workshop, and online).
- Hostesses who have earned a 50%-off item may not apply that discount to an already-discounted product.
- There's no minimum purchase required to participate in this promotion. Sale on!
- For product bundles, you need to use the bundle item numbers provided. If you use individual item numbers, you won't get the discount-bummer.
- You can buy additional products from any of our current catalogs on the same order.
Tuesday, November 19, 2013
Tuesday Tips Blog
Today's tip is a helpful one as you're planning your holidays. Here is everything you need to know when it comes to ordering and receiving your items from Stampin' Up! before Christmas:
"We recommend that you submit your holiday orders by the following dates to receive them by December 24:
- My Digital Studio print products: December 6 for regular shipping, December 14 for Second-Day Air, and December 15 for Next-Day Air
- Traditional products: December 17 by 6:50 PM (MT) via phone or 11:50 PM (MT) via online order
Delivery times vary depending on where you live; if your personal experience indicates that it takes longer for packages to reach you, you should allow a little extra time for shipping during the holidays. As you know, we cannot control delivery times. Holiday mail volumes are high, and our delivery services encourage customers to ship as early as possible to avoid disappointment."
Friday, November 15, 2013
Newest Photopolymer Stamp Set
Stampin' Up!'s newest Photopolymer Stamp Set, Eye Catching Ikat, adds a fabric feel along with trendy geometric patterns to your stamping repertoire! Check it out today!

Wednesday, November 13, 2013
Festive Flurry Ornament Kit
Stampin' Up!'s newest way to help you this holiday season is the Festive Flurry Ornament Kit. You can make beautiful ornaments to give as gifts, decorate your tree, top off the perfect gift, create a sparkly garland or even embellish cards! Check it out online HERE.

Festive Flurry Ornament Kit
#135813
$14.95
Tuesday, November 12, 2013
Terrific Tips Tuesday
Today's tip is brought to you by... Keurig! Did you know Stampin' Up!'s containers for embossing powder and glitter fit perfectly in a K-Cup holder? Try it! Now you can keep these little containers organized and right at your fingertips!

Thursday, November 7, 2013
Seriously Happy Birthday
My son recently got invited to 3 birthday parties. Ack! I needed boy birthday cards - stat!
So, I grabbed a little of this and a little of that and threw some cards together. I love how they turned out! By far, my favorite My Paper Pumpkin kit yet was the one with the bicycle stamp. I just love this stamp! And, it worked perfectly for a boy's birthday. I used an extra piece of washi tape and the "seriously" stamp from some My Paper Pumpkin kits also. Throw in a birthday sentiment from one of my all-time favorite birthday themed sets, Bring on the Cake (in wood mount or clear mount) and you have a quick, easy card perfect for the birthday boy!

Wednesday, November 6, 2013
Craft Room Update
A few months ago I shared the first peek at my future craft room in our new home HERE. Things are moving along and I am excited to share the first peek inside my craft room now that drywall is up. It's so hard to get a perspective of things before drywall. The room itself is about 10' x 10'. My previous room was 12' x 12', but I think this one is laid out better, plus you'll see there is a bump-out that will give room for a counter and storage.
This first picture is the doorway coming into the craft room. Beyond it you can see the window and door to the porch which wraps around to the front of the house also.

I tried to get the pictures going around the room in order. Just pretend you are standing in the room and turning to your right with each picture. You can see the doorway in the left of this picture. This is the bumped out area where I will have wall and base cabinets and a counter. My awesome husband even thought to put a can light right in the center of the soffit for task lighting. The room itself has 4 can lights. It might seem silly, but I know how important good lighting is to good crafting.

Here you can see the right end of the bump-out and the window that faces out front.

And finally, the front corner of the house. The window on the right here is the same window you see to the left of the doorway in the first picture. Not only will I have great overhead light, but there is great natural light coming in, too. The porch roof will keep the direct light out though, which will help prevent fading the paper that I might leave out.

All we have left is trim, painting, cabinets and flooring. It seems we're in the home stretch. I am counting down the days (months) until we can move in. I told my husband I might unpack my craft room before the kitchen. He wasn't amused.
Tuesday, November 5, 2013
Terrific Tips Tuesday
Hello again! Today's tip is so simple it makes me happy! Use the Annual Catalog as a tool. I've already shared some ways you can use the catalog - such as getting inspiration for your own projects.
But there's something I want to make sure you know about and don't miss as you're flipping through the pages. I write all the time that coordination is the key to many of Stampin' Up!'s great products. Well, sometimes you might wonder exactly how to know what coordinates with what. Stampin' Up! makes it easy to know! Any stamped image in the catalog outlined in blue will have a coordinating punch and any image outlined in red coordinates with a die. You can then look at the bottom of the page or next to the item number to see where you can find the coordinating punch or die. Don't you love creating beautiful projects without having to cut around all the details?!
Monday, November 4, 2013
Best of Snow
With a new month comes another Best of 25 Years Stamp Set. I have really enjoyed the walk down memory lane, revisiting some of the most popular stamps from Stampin' Up!'s 25 year history. And this month did not disappoint! I love those cute hedgehogs! Check it out:

You can click on the flyer above for more information, or click HERE to see more "Best of" stamps.
Sunday, November 3, 2013
Christmas Card Stamp Camp Sneak Peak #5
Are you excited now? We will get to make five cards at Stamp Camp! This time, we'll make 4 of each card. And this card uses several new tools and toys from the Holiday Catalog.

Supplies Used:

Supplies Used:
Stamp Sets:
Label Love
That's the Ticket
That's the Ticket
Paper:
Baked Brown Sugar, Calypso Coral and Very Vanilla card stock
Ink:
Baked Brown Sugar
Accessories:
Artisan Label and Ticket Duo Builder punches
Pretty Print Textured Impressions Embossing Folder
Big Shot
Expressions Thinlits Dies
1 1/4" Burlap Ribbon
Pretty Print Textured Impressions Embossing Folder
Big Shot
Expressions Thinlits Dies
1 1/4" Burlap Ribbon
Saturday, November 2, 2013
Christmas Card Stamp Camp Sneak Peak #4
This card reminds me of holding a nice cup of hot chocolate on a cold day. It screams, "traditional" and "cozy". And I just love it and all the elements on it. I hope you do, too!

Supplies Used:

Supplies Used:
Stamp Set:
Wishing You
Paper:
Crumb Cake, Very Vanilla, Old Olive and Cherry Cobbler card stock
Season of Style Designer Series Paper Stack
Season of Style Designer Series Paper Stack
Ink:
Old Olive and Cherry Cobbler Marker
VersaMark
VersaMark
Accessories:
White Embossing Powder
Heat Tool
Chalk Talk Framelits
Big Shot
Chevron Punch
Decorative Label Punch
Cherry Cobbler Seam Binding Ribbon
Glue Dots
Glitter/Glue Pen
Heat Tool
Chalk Talk Framelits
Big Shot
Chevron Punch
Decorative Label Punch
Cherry Cobbler Seam Binding Ribbon
Glue Dots
Glitter/Glue Pen
Friday, November 1, 2013
Christmas Card Stamp Camp Sneak Peak #3
This third card was based on a request. Yes, I take requests! A friend who likes to come to my Stamp Camps asked if we could use a certain stamp set that she had her eye on. I think you'll agree it's a beautiful set, perfect for creating Christmas cards or any winter themed scrapbook page. I got the idea for this card from Mary Fish's amazing blog and switched up the gold for silver:

Supplies Used:

Supplies Used:
Stamp Set:
Snowflake Soiree
Paper:
Whisper White card stock
Brushed Silver card stock
Brushed Silver card stock
Ink:
Silver Metallic Encore Pad
Accessories:
Dimensionals
Designer Vintage Faceted Buttons
Glue Dots
Designer Vintage Faceted Buttons
Glue Dots
Thursday, October 31, 2013
Christmas Card Stamp Camp Sneak Peak #2
Card #2 was inspired by a card I also created last year using the Christmas Lodge stamp set. I then saw a card I loved on page 9 of the Holiday Catalog, so I put the two together and came up with this:


Supplies Used:
Stamp Set:
Christmas Lodge
Paper:
Island Indigo, Coastal Cabana and Whisper White card stock
Winter Frost Designer Series Paper Stack
Winter Frost Designer Series Paper Stack
Ink:
Smokey Slate
Island Indigo
Island Indigo
Accessories:
Sponge
Corner Rounder
Hexagon Punch
Paper Trimmer
Corner Rounder
Hexagon Punch
Paper Trimmer
Wednesday, October 30, 2013
Christmas Card Stamp Camp Sneak Peak #1
I know you've been waiting! I have, too! I had the ideas for these cards figured out last week, but I had to place an order. At least one element on almost every card is something new! On some it might just be the paper we'll use. But, I also got some new "toys" to use too! Excited yet? I am! And, those toys aren't here yet for me to make the "final drafts" of most of the cards. Hopefully today or tomorrow that brown truck will leave a nice brown package at my front door and I'll get to work!
So, for today, I'm going to start by sharing a card that I made last year. Well, I remade since I gave those cards away... last year! I made several of these cards to go along with the gifts the kids gave their teachers at Christmas. They are simple 3" x 3" cards that tuck nicely into small gifts. I decided to use this card design because it will allow us to use the new Envelop Punch Board to make envelopes to go along with the cards. How fun! If you come to Stamp Camp you can gift this cute little set of cards and envelopes to someone on your list or use them like I did, handing them out with gifts. Either way, I know the recipient will appreciate the time and detail even in this simple card.


Supplies Used:
Stamp Set:
Teeny Tiny Wishes
Paper:
Crumb Cake, Wild Wasabi and Garden Green card stock
Season of Style Designer Series Paper (DSP) - For the envelopes
Ink:
Chocolate Chip
Accessories:
Jewels Basic Rhinestones
Dimensionals
Envelope Punch Board
Tuesday, October 29, 2013
Terrific Tips Tuesday
Today's tip includes another handy tool: The Brayer. More than likely you have never heard of it. Next likely, you might even have one, but have never used it! I hear ya! But I don't want you missing out on all the things this wonderful, simple tool can do!

The easiest thing to do with the Brayer is what I use it for the most: making sure my adhesive sticks. Most adhesive and tape runners are actually fully activated when they have pressure and heat or warmth applied to them. The first way you can do that is by flipping your project over (card or scrapbook page) and rubbing your hand/palm over the back of the paper with pressure. But, try doing that over and over again when you are making your Christmas cards and your hand will not be happy. In comes the Brayer! Keep it handy and once you've completed your project, just roll the Brayer over everything to make sure every element stays where you placed it.
The Brayer is also great for inking up and covering a large area. And that's just a jumping off point! Search "brayer techniques" and be prepared to spend some time checking out the flood of results you will get. The, get your Brayer, try something new and have fun! And be sure to share it with me!
Monday, October 28, 2013
Exciting AND Helpful!

The Perfect Holiday Solution
Here's why these card bases will help you and your customers relax and enjoy the season:
- You'll save work and time not having to cut and score cards-even if you're simply making a card or two.
- You'll be able to make multiples in no time.
- You'll save on prep time for your projects - big and small.
Check them out today and let Stampin' Up! take one more thing off your plate during this busy holiday season!
Tuesday, October 22, 2013
Terrific Tips Tuesday
Have you ever had problems lining up your stamps exactly where you want them? Then this tip (via a video from Stampin' Up!) is just for you!
Click on the picture of the Stamp-a-majig below to see the helpful video.

Thursday, October 17, 2013
A little help for my Tuesday Tip!
Stampin' Up! has a new photopolymer set out just in time to help you start planning your Christmas Cards! This one beautiful set is all you need to design many different cards, tags and other Christmas projects. Check it out today!

Tuesday, October 15, 2013
Terrific Tips Tuesday
Today's tip is inspired by my to-do list. Did you know that Christmas is just over two months away? Did you groan or did that bring a smile to your face? Either way, the time to start planning is now so you can actually enjoy the holidays this year. My tip? It's time to start planning your Christmas cards! I'll be doing that this week. My Christmas Card Stamp Camp is November 8th, and that day is rapidly approaching.
Here are some other ways I keep the stress level down when it comes to sending out those annual greetings:


Here are some other ways I keep the stress level down when it comes to sending out those annual greetings:
- Keep a label document with the names and addresses of the people on your Christmas card list. It's easy to edit and when it comes time to address those envelopes all you have to do is print up the labels. Having this document saved is also helpful for other big events. When I had to send out birth announcements for each of our kids, I just printed up my Christmas card labels! It can also be a help when planning showers or birthdays.
- Plan ahead. Don't just decide how you'll make your cards. Of course you need to decide if they'll be hand crafted with card stock or digitally designed. But, are you going to add a family picture? Will it just be tucked inside, or a part of the card?
- Speaking of pictures, have you had them taken yet? If not, today's the day to make that appointment!
- Set a due date. My goal is always to have the cards stuffed, labeled, stamped and ready to send by Thanksgiving. That way, after the turkey is done, I can sit back and enjoy the rest of the holidays! Or, get to work on the next project... Wrapping gifts, decorating, making it to all those school parties and programs, baking... The list is never-ending, but it can be less stressful!
Speaking of less stressful, Stampin' Up! has made navigating their on-line store less stressful! Visit today and check out the new features and stream-lined check-out process!
To leave you with a little inspiration, I thought I'd share some cards I've made for Christmases past:
These first two were made using Stampin' Up!'s digital software, My Digital Studio.


Tuesday, October 8, 2013
Weekly Deals!
Stampin' Up! has decided to celebrate its amazing customers with new "Weekly Deals" offerings. Starting today, you can find several items at a great discount. Don't miss out - these items will be on sale while supplies last. But, the even better news is, Stampin' Up! will bring you new weekly deals every week! So, check back often! Read HERE for more information and visit HERE to shop now!
Terrific Tips Tuesday
Today's tip is something I've shared before, but not as a tip. I am once again excited to share with you our most recent My Paper Pumpkin Projects. Some of my Stamp Club gals and I get together to make our kits. We have so much fun catching up with each other and creating these easy projects. Everything you need is included in the kit, but sometimes we have fun and change things up. You can see two versions of the bicycle card below. On the Wahoo card, I added some ink splatters courtesy of a stamp from a previous MPP kit. After searching Pinterest for some ideas, we also decided to change the card up slightly from the original template. Why not? If you don't think you have time to stamp or start a whole new hobby, this is for you. Each month a new project with all the supplies (except scissors and adhesive) will come magically to your door, ready to be transformed into beautiful cards and scrapbooks. Let Stampin' Up! be your paper crafting fairy godmother!


Friday, October 4, 2013
Holiday Help! Pop & Place tags to the rescue!

Stampin' Up! knows your time is valuable - especially during the busy holiday season! Stampin' Up! has just the kit to help make all your gifts and projects extra special - and extra easy! Introducing the new Pop & Cuts Holiday Tag and Stamp bundles. Two new products will help you with all your projects. First, I'm really excited for the Christmas Tagables Photopolymer Stamp Set:

You can also now get the Pop & Place Holiday Gift Tags Book which has 70+ tags in five designs created using Stampin' Up!'s popular punch and die shapes. If you've never used the punches and dies before, this is a great way to try out the different shapes and see which ones you love the most! Or, simply enjoy the options and the ease of the die cut tags on all your Christmas projects. One less thing to think about during the hectic season just around the corner!
You can buy these two items separately or bundle them and save money! Or, make it a gift and buy the bundle that also includes Clear Block C and the Soft Suede Classic Stampin' Spot!
Click HERE for more information.
| Item | Description | Price |
| 134975 | Pop & Place Holiday Gift Tags Book | $9.95 |
| 134623 | Christmas Tagables Photopolymer Stamp Set | $13.95 |
| 135921 | Pop & Place Holiday Gift Tags Bundle includes
| $19.95 |
| 135290 | Pop & Place Holiday Gift Tags Starter Bundle includes
| $24.95 |
Best of 25 Years - October
Stampin' Up! released the October Best of 25 Years stamp set - and it is a beautiful set that will help you prepare for all your holiday projects and cards! Isn't it beautiful? Click HERE for more information.
Best of Christmas Clear Mount Stamp Set #134384 $14.95

Tuesday, October 1, 2013
Terrific Tips Tuesday
Today's tip is a pretty simple one, but I can always see the "light bulb moment" when I share it with people. It has to do with one of my very favorite tools, the Big Shot.

The tip begins like this: No two Big Shots are exactly the same.
So... That means that sometimes you have to play around a little to get the different dies to work the way you want them to. Sometimes that means you'll have to add a shim (or a an extra layer by adding a sheet of paper to your "sandwich") to get the die to cut just right.
But the biggest tip I share over and over again has more to do with the Multipurpose Platform that comes with the Big Shot and, generally, the embossing folders. The Platform has different "tabs" that create varying thicknesses that work with each different die, framelit or embossing folder. The platforms have suggestions on which tab to use for each accessory. My platform says that I should use Tab 1 for embossing folders. However, I have found that my "sandwich" is too tight and I have a hard time rolling it through and then my paper is almost cut instead of embossed. So I have learned to use no tabs with my embossing folder, just the main part of the platform.
To sum up my tip, play around with your layers in your sandwiches that you run through your Big Shot. You may find that one works better than the other. But, most of all, have fun!
Thursday, September 26, 2013
A kit for those Everyday Occasions
I am so excited to share with you Stampin' Up!'s newest item: The Everyday Occasions Kit. This kit has everything you need (except scissors and adhesive) to make 20 cards for almost any occasion. I'm excited because this is so similar to Stamp Camp - but you can make these cards in the comfort of your own home! This kit will also make a wonderful gift for your friends who love stamping or are just getting started! For even more information, click HERE for the flyer.

Wednesday, September 25, 2013
Heads up for Halloween
Halloween is still a month away, but we always plan ahead when making cards, don't we? Well, Stampin' Up! has come through just in time with a brand new Photopolymer stamp set with a Halloween theme. Check out the flyer HERE for some creepy stamping fun!
Tuesday, September 24, 2013
Terrific Tips Tuesday
Hello again! I think it's time I shared some more of my favorite tools. I shared my all-time favorites HERE, which are also good tools to look for when you are just starting. I have 4 more somewhat basic tools that I love. These are secondary to the previous list, but I still use them almost every single time I scrapbook or make cards.
1. The Big Shot. Oh how I love this tool and all the accessories that go with it. From embossing folders to framelits to dies. You can check out what Stampin' Up! has to offer HERE. On top of being fun to use, Stampin' Up! adds their coordination to the deal. You can find framelits and dies and even embossing folders that match some of your favorite stamp sets. So fun!

2. Stampin' Up!'s Craft and Paper Scissors are another newer favorite of mine. It took me a while to come around the spending $29.95 on them. However, now that I have them, I can say they are worth every penny. Cutting ribbon with these scissors really is like a hot knife through butter. I really can't recommend them enough. If you are looking for an amazing pair of scissors, your search is over.

3. My all-time favorite fun tools are the punches Stampin' Up! offers. Even my husband likes to try out my new ones. These easily punch up (ha ha) your card or project with little work involved. They add depth and dimension. They add easy detail. And they can be used as backgrounds, focal points and even journaling blocks. And, of course, many coordinate with Stampin' Up! stamps. *LOVE*

4. What is a project without paper. I have learned how much I love Stampin' Up!'s paper. First, the card stock is the highest quality I have ever worked with. Second, the Designer Series Paper (DSP or patterned paper). Third, we continue the pattern of coordination. Stampin' Up!'s color families continue from ink to ribbon and brads to, of course, paper. This is the "tool" that will bring your entire project together.


Subscribe to:
Posts (Atom)