Friday, January 31, 2014

Flashback Friday


I found this post from our January Stamp Club meeting a few years ago. Now that we are at the end of January, looking ahead to Valentine's Day, I thought you might appreciate these projects.

I wanted to do a Valentine's Day theme, but I am not especially fond of the usual pinks and purples. When I saw this color combination, I knew it had to be!

We also learned how to use the Sweet Treat Cups to add a special sweetness to our cards. The tab towards the top pulls out revealing a hole through which you can retrieve your candy. That way the recipient doesn't have to tear the card to get to the good stuff!

We used Tempting Turquoise, Real Red, Basic Black, Pear Pizzazz and Whisper White to pull the card together. The Sweetheart stamp set was made to go perfectly with the Full Heart Punch and Sweet Treat Cups.

For an added Valentine's bonus we used the Pillow Box die (given some extra texture with Texturz Plates) to hold mints. We layered a stamp from the retired hostess Love Bug set on Whisper White punched with the Scallop Oval punch over Real Red punched with the Decorative Label punch. I love what layering punches can do for a project!



Tuesday, January 28, 2014

Terrific Tips Tuesday

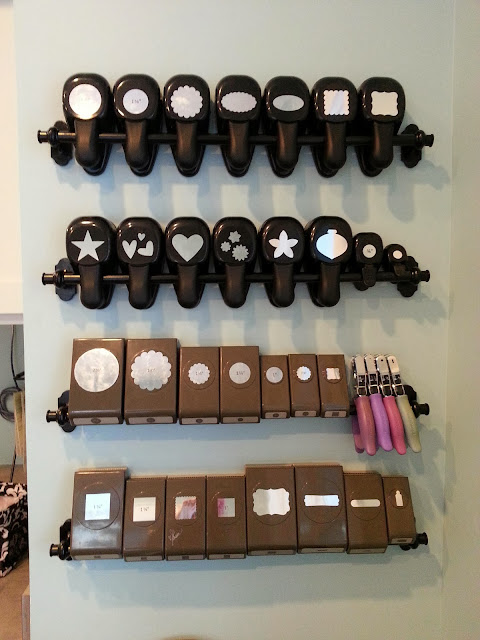
Here we are nearly at the end of January. I can hardly believe it. I thought I would share just a little peak at my new craft room in case you made any New Year's resolutions to get organized. The room isn't completely photo-ready yet, but my husband finally got these rails from IKEA hung. I use them to organize some of my punches for quick and easy access.
He was surprised to come back in the room and see that I had organized them the way I had. He was obviously expecting my OCD self to organize the punches by size. In a way, I did. But to me it was much more important to organize them by the shape of the image they punched, as you can see above. This helps when I am trying to figure out if I have punches that layer well together. Many of them are designed to work together which quickly adds nice detail to your cards and projects.

I knew I would have more punches than rails, but I wasn't sure what I would do with them until I started putting things away. Back in November when Mike and I made a big trip to IKEA in anticipation of our upcoming move I bought this cart, planning to use it in the kitchen. I quickly saw its potential for storage in my craft room, so I made the switch. It rests right below the rails for the punches and not only holds my other punches (with room to grow) but also my Big Shot, cutting plates and platform and various other supplies. I am very happy with this done little corner of my craft room and I can't wait to share more with you!

Friday, January 24, 2014

Flashback Friday

I made this card a few years ago for a good friend. I saw a very similar card on-line and fell in love with the color combination of Melon Mambo and Pumpkin Pie. How FUN! The Medallion stamp is just the most versatile stamp I think I have right now. The scallop circle punch adds a perfect accent in the middle with, of course, a rhinestone. I would also say that my oval punch, scallop oval punch and the Oval All stamp set probaby get the most use out of anything I have. Together they add so much to a card and can work for almost any occasion.

I loved this card so much that I used it, changing just the color combination, for a Stamp Camp.
Jessica birthday

Tuesday, January 21, 2014

Terrific Tips Tuesday

Last week I shared a tip about getting your clear stamps to cling to the blocks better during a dry winter. Well, today's tip is similar. Did you know that adhesives can adhere differently depending on the climate, also? If you are having trouble getting your adhesive to hold together, it might be time to try a different adhesive!

Stampin' Up! has many great adhesives and one of them is sure to solve your problem. I think of adhesives like I think of people: They are all a little different and that's what makes them special! Each one generally is "gifted" in a certain area. Can some adhesives do the same job as another? Absolutely. But generally they are each made for specific tasks or to be used a specific way. So, play around a bit and see what you prefer. It is always good to have several different types of adhesive on hand for all the different projects you might come up with. Here are just a few of my favorites:

My favorite all-around adhesive is Tombow's SNAIL. It is so handy to use and your hands stay mess-free. A special treat is that it is clear, so if you have ribbon or a lacy strip of paper to adhere, you can usually use the SNAIL and still keep the adhesive hidden.

I have a crazy love for my Dimensionals. They, as the name states, add dimension to your project by popping up whatever layer you are adhering. An added bonus is that these things are super sticky. You don't have to worry about parts of your project falling off when you use these guys. You get 300 in a package, so they will last you a nice, long time as well.

Another favorite of mine are the Mini Glue Dots. These guys are also clear, so they are another great option when you're worried about your adhesive showing through. They are great for putting together boxes made from clear or vellum/opaque sheets. They are also my go-to adhesive for buttons and small bows.

This is just a quick look at some of my favorite adhesives. I am beginning to think I need to do another post sometime on different adhesive options and their great uses...
For now, to see more, head over to the Adhesives page and check out everything that Stampin' Up! has to offer.

Friday, January 17, 2014

Flashback Friday

This card is from one of my very first Stamp Camps, back in October, 2010. It is still one of my favorites. I love the simplicity of the repeated image along with the unexpected color combination.


To make this card I used Tangerine Tango for the background and the sentiment, which I punched out using the Modern Label Punch. I used the "Friend to Friend" sentiment from the Teeny Tiny Wishes stamp set. Chocolate Chip card stock makes a great base for the card design. I used the same image from Pocket Silhouettes stamped in Chocolate Chip ink on squares of Cajun Craze, Baja Breeze, Real Red and Daffodil Delight and tied it all together with 1/4" Grosgrain Ribbon in Real Red.

Tuesday, January 14, 2014

Terrific Tips Tuesday

Today's tip is a quick one for your clear blocks. You may be noticing that with the cooler, drier weather your clear mount stamps aren't sticking as well to the blocks. There are several fixes:

1. You can "huff" on the clear block before adhering the stamp. Simply hold the block in front of your mouth and blow out or huff like you would to warm your hands up outside. This will add just enough moisture to the block to help the stamp cling better. This is an easy, quick fix when you are right in the middle of stamping.

2. If you are having trouble getting your clear blocks to cling to the stamps, make sure you've recently cleaned your blocks. You can easily do this by simply washing your blocks with dish soap and drying thoroughly. You may also want to invest in a simple cleaning cloth from Stampin' Up! It would be great to have on hand for those times when you realize your blocks need some cleaning.

3. If you try both of these methods and they don't improve the cling between your block and stamps, I have one more really helpful hint. Simply rub some Tombow Multi-Purpose Adhesive on the back of your clear mount stamps. When allowed to dry before adhering to another surface, this adhesive becomes temporary. In other works, it will be tacky enough to hold the stamp to the block, but you will easily be able to remove the stamp when you are done. No more stamp left in the ink or falling off onto your project!


Friday, January 10, 2014

Flashback Friday

This card shouts Valentine's Day, but by using the different sentiments from the Teeny Tiny Wishes stamp set this card could be a beautiful thank-you, wedding or even birthday card! We made this card for the February 2012 Stamp Camp and it's still a favorite of mine!


Stamp Sets:
Creative Elements
Teeny Tiny Wishes

Paper:
Pink Pirouette
Cherry Cobbler
Very Vanilla

Ink:
Cherry Cobbler
Soft Suede 
VersaMark with Cherry Cobbler Embossing powder

Accessories:
Lace Ribbon Border Punch
Heat Tool, Tray, etc
Sponge
Corner Rounder Punch

Tuesday, January 7, 2014

Terrific Tips Tuesday

Recently I mentioned sponging the edge of a piece of card stock. This method gives a nice, aged look to a card. It helps soften the look of the edge of the paper and can even add texture to a project. I keep my sponges very handy because this is a technique I use frequently on my cards and my scrapbook pages. 

Simply hold the card stock up in your non-dominant hand, tap the sponge on the ink pad and brush it perpendicular to the card. You can play around with angles, pressure, amount of ink, and even color of ink. I generally use a brown like Chocolate Chip, Sahara Sand, Crumb Cake and now the new In-Color, Baked Brown Sugar. It just depends on the look you are going for. Those neutrals are great for an aged look, but depending on the style of your project and the colors used, try other colors: Grays, pinks and blues add great touches, also!

Of course, Stampin' Up!'s sponges are great for this technique. And to make them last even longer and to keep from mixing colors, simple cut them into 4 wedges each and use each wedge for a different color or until it's so full of ink your fingers are getting messy when you use it.


Friday, January 3, 2014

Flashback Friday

This card is one of my all-time favorites. I love how the Melon Mambo embossing powder pops on the Basic Gray card stock. I made this card for Mike's cousin and her new husband at their wedding a couple years ago. Their beautiful wedding invitations were the inspiration for the card. The style is similar and their colors were pink and gray. This card was so much fun to make! And very simply elegant.

I used the Tulip Embossing folder to give the card an elegant look on Melon Mambo card stock. Then I ran Basic Gray card stock through the Big Shot using the Top Note die. I used the Melon Mambo embossing powder for the center image which is from the retired Friends 24-7 stamp set and the "For the Newlyweds" sentiment from Teeny Tiny Wishes. I love the pop and texture that heat embossing can add to a card.